


Introduction
In a previous blog post, we restricted access to your Always Free Oracle ATP database to trusted IP addresses.
That’s good to start with, but to make your APEX apps available to the public internet or allow access from a different set of trusted IP addresses, you will need to add OCI network infrastructure. The good news is that this can be achieved using tools provided for free by Oracle.
As an added bonus, you’ll get a vanity URL for your APEX environments.
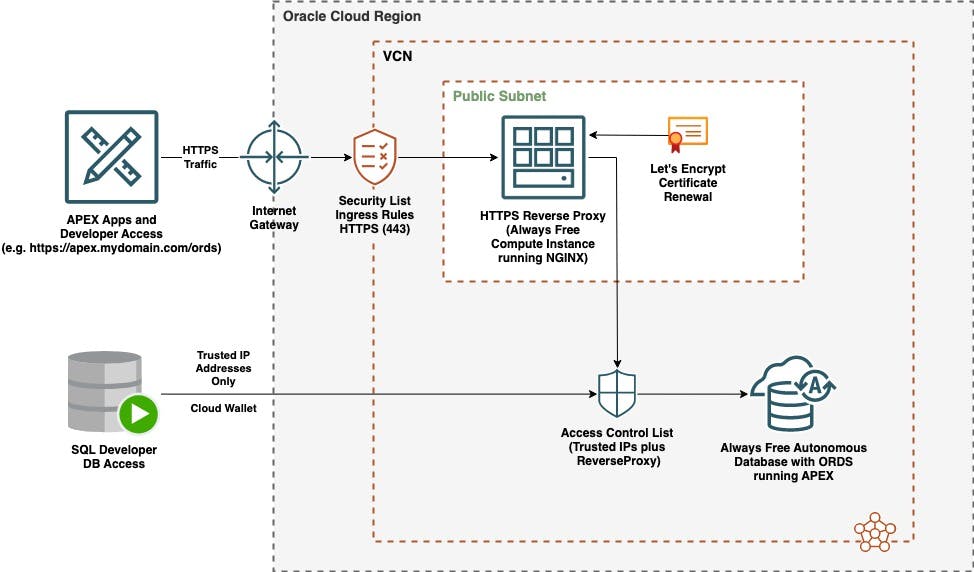
Architecture
A reference architecture from Oracle for securing Paid ATP access is given in the blog below:
Note that this shows ATP running in a Private Subnet, and a Load Balancer is used to direct HTTPS traffic to Autonomous. One of the restrictions of Always Free ATP instances is that they cannot be placed in a Private Subnet. Another challenge of the above architecture is the Load Balancer certificate – you can get a certificate for free from Let’s Encrypt, but installation and ongoing renewal of the certificate isn’t automated or straightforward – see MOS Note How to use the PEM files supplied by LetsEncrypt on an SSL listener for your OCI LBaaS (Doc ID 2815563.1).
A simpler architecture that will work for Always Free is shown below, using an NGINX Reverse Proxy server. You’ll pay nothing to Oracle for this, the only restriction is that you’ll need to have ownership of an internet domain. You can get this for a moderate cost from a domain name registrar such as GoDaddy.
Configuration
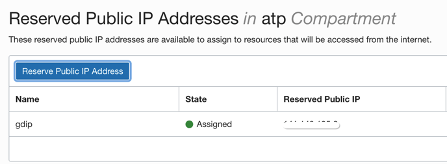
Reserve IP address
DNS Mapping
Log onto your DNS provider (e.g. Go Daddy or Microsoft). Access your DNS mappings and add an "A" entry as shown below.

In this case, adding "apex" means that I am mapping apex.mydomain.com to the IP address I reserved in the previous step.
Create Compute Instance
Create an Always Free instance of Compute using Oracle Linux. Download and store your SSH keys securely as you will need them for server access when installing NGINX and Certbot.

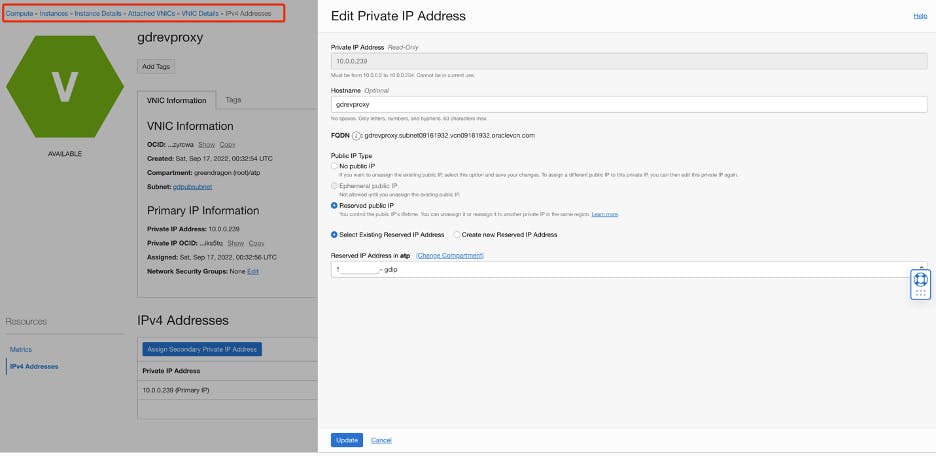
Edit the VNIC entry for your instance to use the reserved IP address you reserved before, replacing the ephemeral IP address attached to the instance.
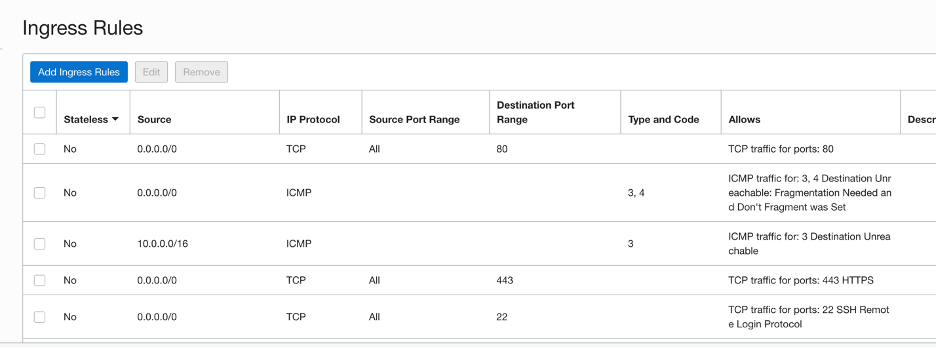
Configure Ingress Rules
Update the Ingress Rules for your VCN to allow inbound HTTPS and HTTPS traffic. You could also control the source IP addresses here to restrict traffic from untrusted IP addresses.
Install NGINX
NGINX will be used to reverse proxy HTTPS traffic to APEX running in your Autonomous Database. Log onto the server and install NGINX:
# Update OS
sudo yum update

# Enable firewall for HTTP and HTTPS
sudo firewall-cmd --permanent --zone=public --add-service=http
sudo firewall-cmd --permanent --zone=public --add-service=https
sudo firewall-cmd --reload

# Install NGINX
sudo yum install nginx
sudo systemctl start nginx
Some useful locations for NGINX on Oracle Linux:
# Default Page
cd /usr/share/nginx/html

# Logs
sudo vi /var/log/nginx/access.log
sudo vi /var/log/nginx/error.log
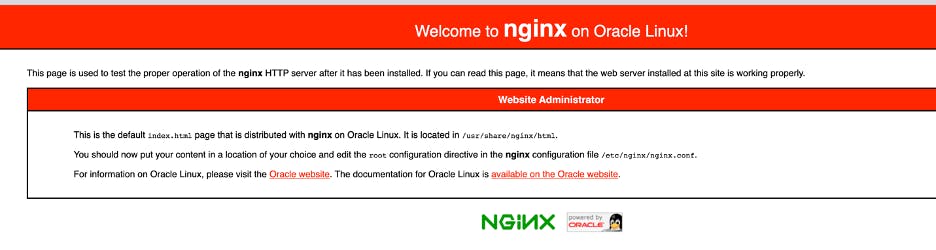
Verify the installation by navigating to your IP address in a browser over HTTP (e.g. http://your_reserved_ip/
Add a reverse proxy entry for your domain within the conf.d directory, substituting the URL to your APEX instance and your domain name:
# Set httpd_can_network_connect true
# See https://stackoverflow.com/questions/23948527/13-permission-denied-while-connecting-to-upstreamnginx
getsebool -a | grep httpd
sudo setsebool httpd_can_network_connect on -P


# Edit Conf File
sudo vi /etc/nginx/conf.d/apex.yourdomain.com.conf

server {

    server_name apex.yourdomain.com;

    location / {
       proxy_set_header Origin "";
       proxy_set_header X-Forwarded-Host $host:$server_port;
       proxy_set_header X-Forwarded-Server $host;
       proxy_set_header X-Forwarded-For $proxy_add_x_forwarded_for;
       proxy_pass https://youratpinstanceurl;
    }

}
Install Certbot
The steps below are specific to Oracle Linux 8 and come with thanks to Tim at Oracle Base:
# Confirm your Oracle Linux release
cat /etc/oracle-release

# UPDATE EPEL Library
cd /tmp
wget https://dl.fedoraproject.org/pub/epel/epel-release-latest-8.noarch.rpm
rpm -Uvh /tmp/epel-release-latest-8.noarch.rpm

# Install SNAPD
dnf install -y snapd
systemctl enable --now snapd.socket
systemctl start snapd
ln -s /var/lib/snapd/snap /snap

# Install CERTBOT
sudo dnf install certbot

# Run CERTBOT
sudo certbot --nginx
Once installed, you can renew the LetsEncrypt certificates manually using:
sudo /usr/bin/certbot renew
It's easier to refresh these on a regular basis using a cron job:
sudo su
crontab -e

# Add
0 22 * * * /bin/certbot renew --quiet --post-hook "systemctl restart nginx"
Configure ATP Trusted IP List
Finally, we need to configure your Autonomous Database to allow traffic from the Reverse Proxy in addition to any trusted IP addresses.

The Acid Test
Finally, navigate to your chosen URL over HTTPS, and you should see APEX:

Summary
You now have an APEX instance where the front-end is accessible over the public internet, and the back-end database is restricted to your known and trusted IP addresses.
You can also add additional restrictions to the APEX front-end using the VCN ingress rules, for example, to allow access from within a company network.
Epilogue
A drawback of this approach is that Authentication Schemes based on Social Sign-on will not work using a simple Reverse Proxy. The issue is the callback URL that ATP APEX sends to the Social Sign-on provider; there is no easy way for this to be changed to your domain URL.
If that's a deal breaker for you, you need to go with customer-managed ORDS instead. I hope this will change in the future, as I'd rather not manage the ORDS upgrades manually.